1. If you haven’t already done so, you must install the driver software that came with your digital camera. If you have lost the original software, you may be able to downloaded the drivers from the camera manufacturer's Website. This will allow your computer to communicate with your camera.
2. Connect your camera to your computer If you need help with this, see your camera’s manual.
3. From the FotoFinish File menu, select Get
Images from Camera or select the Camera Capture Tool ![]() from the toolbar.
from the toolbar.
4. Select Download Directly from Camera or Transfer Photos from Removable Media. If your camera came with a TWAIN driver you should choose Download Directly from Camera. If your camera appears on your system as a storage device (as many Sony cameras do) select the Removable Media option. If you are using a memory or flash card reader, select Removable Media. If you’re having trouble, see Troubleshooting a Camera Connection below, or consult your camera’s manual
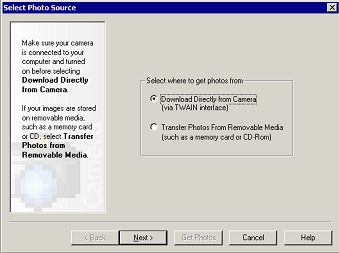
Select a Photo Source
5. FotoFinish will display the name of the device that it thinks is currently selected for image transfer. If your camera does not appear as the currently selected device, click Select New Device to see a list of other devices that you can select. If your camera is not listed here, it is not a TWAIN compatible device or the drivers haven't been installed properly. Please consult the camera's documentation for further information.
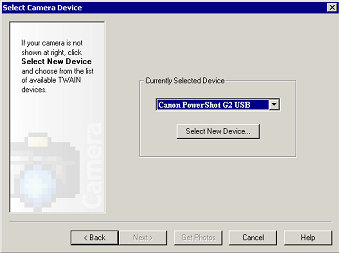
If your camera is not selected here, click on Select New Device
6. After identifying your camera as the device, you select where you'd like to place your transferred photos. To add photos to an existing album select Save to and choose an album name from a drop down list. This list contains albums located in your My Albums area. To save your photos in a new folder on your hard drive, choose Save to New Album. You will be able to specify its name and location in the next step.
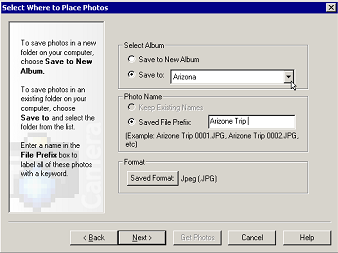
Specify a location and format for your transferred images
7. By default, FotoFinish will save your images with the prefix Photo, but you can choose your own, such as Summer or some other useful identifier. By default FotoFinish will save your images in JPG format, but you can choose a different format by clicking on the Saved Format button. In addition to JPG you can save your images as PNG, BMP, or TIFF files.
Why choose another format? JPEG is a lossy file format, which means you lose image information every time you resave an image. If you want to preserve the quality of your images through several touch-up sessions, try using PNG, which is compressed by a lossless file format. Most Web browsers also support the PNG file format. To learn more about the different file formats, read File Formats and Image Properties in the chapter on Understanding Digital Images.
8. If you opted to place your images in a new album, once you click Next, you will be prompted for the name and location of the album. FotoFinish automatically picks a default location, but you can change this location by clicking on the Change Location button.
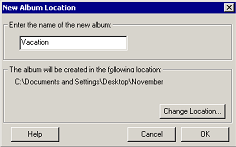
Specify the location of a new album
9. At the Confirmation dialog, check to make sure your camera is connected to your computer and turned on, then click Get Photos. The new Album will be added to the My Albums section of your FotoFinish Image Explorer.